Soft & Buttery: Easy Homemade Olive Garden Copycat Breadsticks
There’s a universally recognized comfort in a basket of warm, buttery breadsticks appearing at your table. For many, that iconic experience is synonymous with Olive Garden – those irresistible, garlicky, unbelievably soft dipping bread sticks that practically melt in your mouth. What if we told you that achieving that restaurant-quality experience at home is not just possible, but surprisingly easy? Forget the intimidation of baking with yeast; this comprehensive guide will walk you through crafting your own batch of pillowy-soft, deeply satisfying breadsticks that rival your favorite Italian chain.
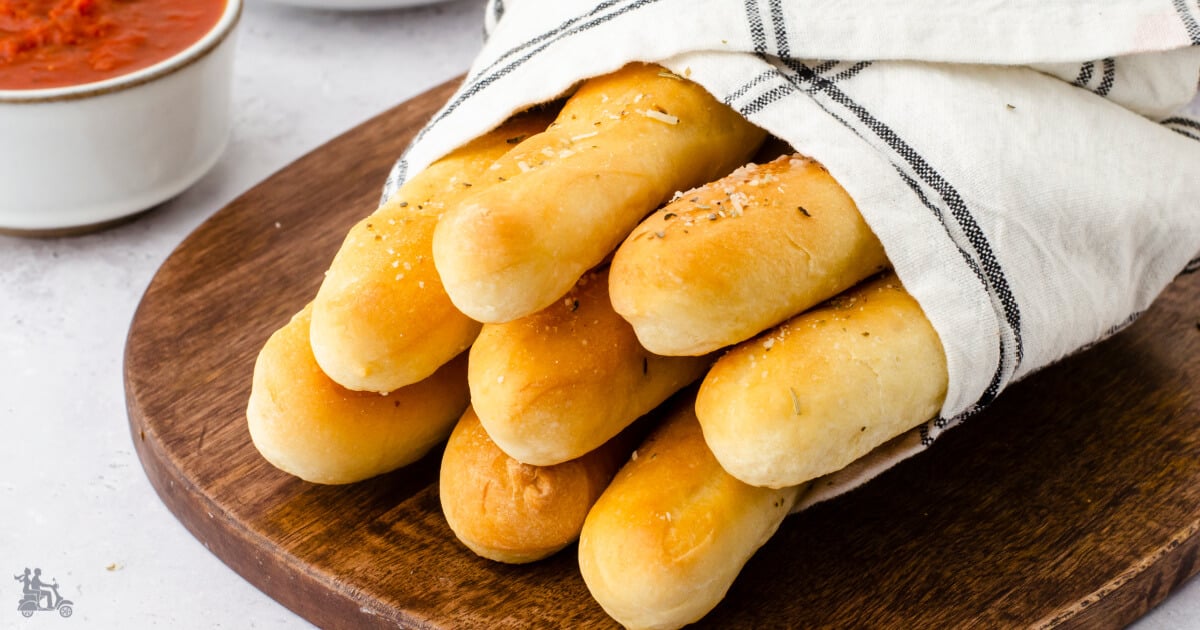
Imagine pulling a tray of golden-brown perfection from your oven, the aroma of garlic and butter filling your kitchen. These aren't just any breadsticks; they're an experience waiting to happen, perfect for dunking into your favorite soup, sopping up pasta sauce, or simply enjoying on their own. Get ready to elevate your home dining with this beloved classic.
Why Homemade Breadsticks Are Always a Winner
There's an undeniable magic to homemade bread, and breadsticks are no exception. Beyond the sheer delight of fresh-baked goods, making your own offers a multitude of benefits:
- Unbeatable Freshness: Nothing compares to breadsticks served warm, just minutes out of the oven. The soft texture and vibrant flavors are at their peak.
- Cost-Effective: With simple, pantry-staple ingredients, you can produce a large batch for a fraction of the cost of dining out or buying pre-made.
- Ingredient Control: You dictate what goes into your breadsticks. Opt for high-quality flours, like fresh milled hard white wheat, for a healthier twist without compromising taste or texture. In fact, many are surprised that a whole wheat flour can yield such beautiful, white, and soft results! You can learn more about this in our Bake Soft 'Whole Wheat' Breadsticks with Fresh Milled Flour article.
- Customization Galore: From shaping (longer and thinner like Olive Garden, or shorter and thicker for a Little Caesar's vibe) to seasoning, you're the master chef.
- The Joy of Creation: There’s immense satisfaction in creating something delicious from scratch. It’s a rewarding activity, even for novice bakers.
These delightful accompaniments pair wonderfully with almost any meal, from a hearty lasagna to a simple green salad. They're a family favorite for a reason, promising endless enjoyment with every bite.
Unlocking the Secret to Perfectly Soft & Buttery Texture
The hallmark of a great Olive Garden copycat breadstick is its incredible softness. It's that irresistible, fluffy interior that makes them so addictive. Achieving this isn't rocket science, but it does rely on a few key principles:
- The Right Flour Matters: While all-purpose flour works well, using hard white wheat flour (especially freshly milled) is a game-changer. This type of whole wheat provides fantastic structure and a beautiful light color, fooling even the most skeptical whole-wheat critics. Its protein content develops gluten effectively, crucial for that desirable chewy-soft texture.
- Proper Kneading is Key: Don't rush this step! Whether by hand or with a stand mixer, adequate kneading (typically 5-7 minutes in a mixer) develops the gluten network, giving the breadsticks their characteristic elasticity and ability to hold air. You're looking for dough that passes the "stretch test" – meaning it can be stretched thin enough to see light through it without tearing. This ensures a light and airy finished product.
- The Magic of Yeast & Rising: Yeast is your best friend here. It's responsible for the aeration, fluffiness, and distinct bread flavor. Two rises are essential: the first, a bulk fermentation until doubled in size, allows flavors to develop and the dough to become light; the second, a shorter rise after shaping, gives the breadsticks their final boost before baking.
- Embrace the Butter: Butter isn't just for topping; it contributes to the richness and tenderness of the dough itself. And, of course, a generous slathering of melted butter post-bake is non-negotiable for that signature Olive Garden taste and unbelievably soft dipping bread sticks experience.
By focusing on these elements, you're guaranteed a batch of breadsticks that are light, fluffy, and perfectly soft, ready to be enjoyed.
Step-by-Step: Crafting Your Own Dippable Delights
Making these copycat breadsticks is surprisingly straightforward, making it an excellent project for beginners looking to dip their toes into yeast breads. If you're new to breadmaking, our
Beginner's Guide to Soft Homemade Restaurant-Quality Breadsticks offers even more foundational tips. Here's how to bring those coveted soft dipping bread sticks to life:
Ingredients You'll Need:
- Warm Water
- Active Dry Yeast
- Granulated Sugar (feeds the yeast)
- Hard White Wheat Flour (or all-purpose)
- Salt
- Olive Oil (for the dough and shaping)
- Melted Butter
- Garlic Salt and/or Parmesan Cheese (for topping)
The Process:
- Activate the Yeast: In your stand mixer bowl, combine warm water, sugar, and yeast. Let it sit for 5-10 minutes until foamy, indicating the yeast is active.
- Mix the Dough: Add the flour and olive oil to the yeast mixture. Add the salt last, directly on top of the flour (salt can inhibit yeast if in direct contact initially). Mix on low speed, then increase to medium, kneading for 5-7 minutes. The dough should be smooth, elastic, and pass the stretch test.
- First Rise: Lightly oil a large bowl, place the dough inside, turning once to coat. Cover with plastic wrap or a clean kitchen towel and let it rise in a warm place until doubled in size, about 1 hour (this can vary based on room temperature).
- Shape the Breadsticks: Gently punch down the dough to release air. Turn it out onto a lightly oiled surface. Divide the dough into 16 equal pieces. Take each piece, roll it into a tight ball (like shaping a dinner roll), then roll it into a "snake" shape, about 6-8 inches long. For Olive Garden's signature look, aim for longer and thinner. For a slightly different experience, make them shorter and thicker. Ensure any seams are on the bottom for a smooth, professional finish.
- Second Rise: Arrange the shaped breadsticks on a baking sheet lined with parchment paper, leaving some space between them. Cover loosely and let them rise again for another 30 minutes. This final rise contributes significantly to their lightness.
- Bake to Perfection: Preheat your oven to 375°F (190°C). Bake the breadsticks for 14-16 minutes, or until golden brown.
- Butter & Serve: Immediately upon removing them from the oven, brush generously with melted butter. Sprinkle with garlic salt and/or grated Parmesan cheese. Serve warm and watch them disappear!
Beyond the Bake: Toppings, Servings, and Savvy Tips
Once your soft dipping bread sticks are baked, the fun doesn't stop there. The toppings are what truly make them shine and capture that classic restaurant essence.
Essential Toppings:
- Garlic Butter & Parmesan: This is the iconic duo. Melted unsalted butter infused with garlic salt, perhaps a touch of garlic powder, and a generous dusting of Parmesan cheese applied while the breadsticks are piping hot ensures maximum flavor absorption.
- Herb Infusion: For a twist, mix in a pinch of Italian seasoning, dried oregano, or even fresh finely chopped parsley into your melted butter.
- Coarse Sea Salt: A sprinkle of flaky sea salt adds a delightful textural contrast and enhances the overall flavor.
Serving Suggestions:
These versatile breadsticks are more than just a side; they're a centerpiece!
- Soup & Salad Companion: The quintessential pairing! They're perfect for dunking into creamy tomato soup, hearty minestrone, or complementing a crisp garden salad.
- Pasta Partner: Naturally, they belong alongside any pasta dish – spaghetti and meatballs, fettuccine alfredo, or a rich lasagna.
- Savory Snack: They're so good, you might just find yourself eating them on their own as a satisfying snack.
- Creative Gifting: Inspired by Olive Garden's past offerings, consider presenting a "breadstick bouquet" tied with a ribbon! It's a fun, unique, and delicious alternative to flowers.
Savvy Baker's Tips:
- Don't Be Afraid of Yeast: Many beginners are intimidated by yeast, but it's forgiving. Just ensure your water temperature is right (around 105-115°F or 40-46°C) to activate it.
- Make a Big Batch: These breadsticks freeze beautifully! You can freeze the shaped, unbaked dough (thaw and let rise before baking) or freeze the baked breadsticks (reheat from frozen). This makes future breadstick cravings incredibly easy to satisfy.
- Oiled Surface for Shaping: Rolling dough on an oiled surface prevents sticking and helps create those smooth, uniform breadsticks.
In conclusion, there’s no need to leave the comfort of your home to enjoy those beloved soft dipping bread sticks. With a few simple ingredients and a straightforward process, you can recreate the magic of Olive Garden’s famous breadsticks right in your own kitchen. This recipe is not just about making bread; it’s about creating moments – the aroma filling your home, the joy of sharing warm, buttery goodness, and the immense satisfaction of a perfectly executed homemade treat. So go ahead, don't be intimidated. Embrace the baker within, and get ready to impress your family and friends with these irresistible, restaurant-quality breadsticks!