Bake Soft 'Whole Wheat' Breadsticks with Fresh Milled Flour: A Homemade Delight
Imagine the warmth of freshly baked breadsticks, their aroma filling your kitchen, promising a delightful treat that's both comforting and incredibly satisfying. But what if those irresistible soft dipping bread sticks were also incredibly wholesome, crafted with the goodness of whole wheat flour you milled yourself? This article delves into the rewarding world of making your own soft breadsticks, utilizing the unparalleled benefits of fresh milled flour, specifically hard white wheat. Prepare to transform humble ingredients into light, fluffy, and utterly delicious whole wheat breadsticks that rival your favorite restaurant versions, perfect for dipping, sharing, or enjoying all on their own.
For many, the idea of "whole wheat" bread conjures images of dense, heavy loaves. However, we're here to shatter that misconception. By harnessing the power of fresh milled hard white wheat, you can achieve a soft, pliable, and incredibly light texture, making these whole wheat breadsticks a revelation. They offer a beautiful, subtly golden color that can easily fool even the most skeptical palate into forgetting they're enjoying a full-bodied whole grain treat. Whether you're a seasoned baker or just dipping your toes into the world of yeast breads, this journey promises a rewarding experience and an end product you'll be proud to share.
The Magic of Fresh Milled Hard White Wheat Flour in Breadsticks
The secret to achieving truly extraordinary whole wheat breadsticks lies significantly in your choice of flour. Moving beyond commercially processed whole wheat, which often has its germ and bran separated and then reintroduced (or sometimes removed entirely to extend shelf life), fresh milled flour offers a spectrum of benefits. When you mill your own whole wheat flour from berries just before baking, you retain all the vital nutrients, enzymes, and the full, complex flavor profile that often diminishes with oxidation in pre-ground flours. This freshness translates directly into a more flavorful and vibrant breadstick.
Specifically, hard white wheat berries are a game-changer for these soft dipping bread sticks. Unlike the more common hard red wheat, which gives a darker hue and a more robust, slightly nutty flavor often associated with traditional whole wheat bread, hard white wheat offers a milder taste and a lighter crumb. This characteristic makes it an ideal choice for tricking those who might typically shy away from whole grain options. The resulting flour is beautifully light in color, lending a visually appealing "white bread" aesthetic, yet it delivers all the nutritional advantages of a whole grain. Moreover, the strong gluten structure inherent in hard wheat varieties ensures your breadsticks develop that desirable chewy-yet-soft texture without becoming overly dense.
Using fresh milled flour also impacts dough hydration and handling. Freshly ground flour is "thirstier" than aged flour, meaning it absorbs liquids differently. This can sometimes require slight adjustments to your recipe, but the result is a dough that often feels more alive and extensible, contributing to the incredible softness and lightness of the final breadsticks. It's an investment in quality ingredients that truly pays off in the final product's taste, texture, and nutritional value.
Crafting Your Perfect Soft Dipping Bread Sticks: A Step-by-Step Guide
Creating these delightful whole wheat breadsticks is surprisingly straightforward, making it an excellent recipe for those new to baking with yeast. The process generally involves a few key stages: mixing, primary proofing, shaping, secondary proofing, and baking. Let's walk through it:
- The Dough Mix: Start by combining your fresh milled hard white wheat flour with other simple ingredients like warm water, yeast, a touch of sweetener (honey or sugar), and a good quality fat (like olive oil or melted butter). It's often recommended to add salt last, as direct contact with yeast can sometimes inhibit its activity. A stand mixer is your best friend here, allowing for consistent and thorough kneading. Mix for about 5-7 minutes until the dough becomes smooth, elastic, and passes the "stretch test." This means you can gently pull a small piece of dough, stretching it thin enough to see light through it without it tearing – a clear sign of proper gluten development essential for soft, airy breadsticks.
- First Rise (Bulk Fermentation): Once kneaded, place your dough in an oiled bowl, cover it, and let it rise in a warm place until it has doubled in size. This usually takes about an hour, depending on your kitchen's temperature. This initial rise allows the yeast to work its magic, developing flavor and creating those crucial air pockets that contribute to a light texture.
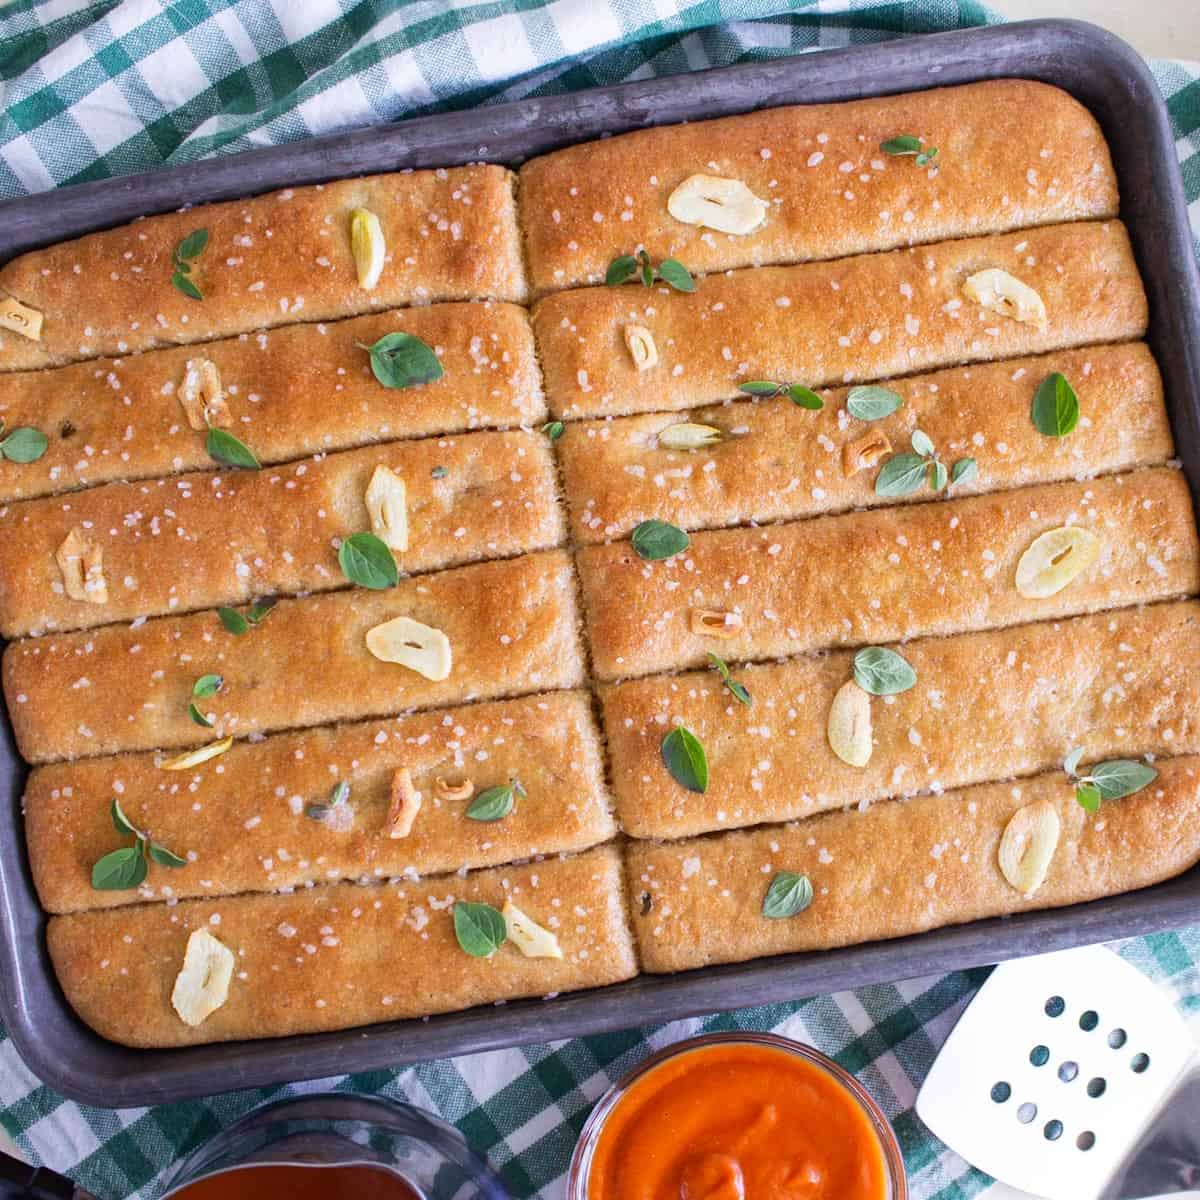
- Shaping Your Breadsticks: Gently punch down the dough to release the air. Then, divide it into equal pieces – around 16 for a standard batch works well. For shaping, take each piece and first roll it into a smooth, round ball, much like you would for a dinner roll. Then, on a lightly oiled surface, roll it out into a "snake" or log shape. You can adjust the length and thickness to achieve your desired style: longer and thinner for that classic Olive Garden appeal, or shorter and thicker for a Little Caesar's-esque experience. Remember to tuck any seams underneath for a perfectly smooth top finish.
- Second Rise (Proofing): Arrange your shaped breadsticks on a baking sheet lined with parchment paper. Cover them lightly and let them rise again for about 30 minutes. This second, shorter rise allows them to puff up beautifully, ready for the oven.
- Baking to Golden Perfection: Preheat your oven to the recommended temperature (typically around 375-400°F or 190-200°C). Bake the breadsticks for 14-16 minutes, or until they are golden brown and cooked through. Keep a close eye on them, as oven temperatures can vary.
Embracing the process of making these soft whole wheat breadsticks is not only enjoyable but also incredibly gratifying. The simple steps, coupled with the unique benefits of fresh milled flour, ensure a successful and delicious outcome every time.
Elevating Your Breadstick Experience: Toppings and Pairings
Once your fresh milled whole wheat breadsticks emerge from the oven, warm and inviting, the real fun begins. While they are undoubtedly delicious on their own, a few simple additions can transform them into an even more irresistible treat, perfect for any meal or occasion. The classic approach, inspired by popular restaurant breadsticks, involves a generous slathering of melted butter immediately after baking, followed by a sprinkle of grated Parmesan cheese. The butter soaks into the warm bread, creating an incredibly moist and flavorful crust, while the Parmesan adds a salty, savory kick.
But don't stop there! Consider expanding your topping repertoire. A simple garlic salt blend, or a homemade mixture of garlic powder, onion powder, and dried Italian herbs (like oregano, basil, or rosemary), can infuse your soft dipping bread sticks with an aromatic burst of flavor. For a more sophisticated touch, a brush of herbed olive oil (infused with fresh garlic and rosemary) can elevate the experience. Experiment with a sprinkle of red pepper flakes for a hint of heat, or some everything bagel seasoning for a unique twist.
These versatile breadsticks are not just a side dish; they can be the star of a meal or a delightful accompaniment. Pair them alongside a hearty bowl of soup, a rich stew, or a comforting pasta dish. They are also perfect with fresh salads, providing a satisfying crunch and substance. And of course, the "dipping" aspect of these breadsticks is paramount. Beyond traditional marinara, consider serving them with a vibrant pesto, a creamy hummus, or simply good quality olive oil and balsamic vinegar for an elegant appetizer. The possibilities are endless, making these homemade soft whole wheat breadsticks a truly adaptable addition to your culinary repertoire.
Tips for Success & Making it Worth Your While
Don't let the idea of making bread intimidate you. This recipe for soft whole wheat breadsticks with fresh milled flour is remarkably forgiving and an excellent entry point for beginners. Here are a few extra tips to ensure your success and maximize your baking efforts:
- Yeast Activation: Always ensure your water is warm, not hot, when proofing yeast (around 105-115°F or 40-46°C). Water that's too hot will kill the yeast, and water that's too cold won't activate it.
- Rising Environment: Yeast loves warmth. If your kitchen is cool, find a warm spot for your dough to rise, such as inside a slightly warm (turned off) oven or near a sunny window.
- Don't Overwork the Dough: While good kneading is essential for gluten development, over-kneading can make the dough tough. The stretch test is your best indicator.
- Freezing for Future Enjoyment: These breadsticks are perfect for batch baking. You can freeze the shaped, unbaked dough (after the second rise, flash freeze them on a baking sheet, then transfer to a freezer bag) or freeze the fully baked and cooled breadsticks. When ready to enjoy, simply thaw and bake (or reheat) as needed. This makes fresh, homemade breadsticks available whenever the craving strikes, making your effort incredibly cost-effective compared to store-bought options.
- Get Creative with Gifting: As hinted by some bakeries, a "bouquet of breadsticks" can be a unique and charming gift instead of flowers. Arrange them creatively in a basket or wrapped bouquet for a thoughtful, delicious present.
By following these simple guidelines, you'll not only master the art of making soft, fluffy whole wheat breadsticks but also gain confidence in your bread-making abilities. Remember, practice makes perfect, and every batch brings you closer to your ideal homemade breadstick.
Conclusion: The Irresistible Charm of Homemade Whole Wheat Breadsticks
Embarking on the journey of baking soft whole wheat breadsticks with fresh milled flour is a culinary adventure that promises immense rewards. From the earthy aroma of milling your own hard white wheat to the satisfying sight of golden-brown loaves emerging from the oven, every step is a testament to the simple magic of homemade food. These aren't just any breadsticks; they are a wholesome, flavorful, and incredibly light rendition of a beloved comfort food, perfectly suited for soft dipping bread sticks into your favorite sauces or serving alongside any meal.
The subtle flavor and appealing color of fresh milled hard white wheat defy the common misconceptions of whole grain baking, offering a delightful surprise to even the most discerning palates. Whether you're aiming for an Olive Garden-esque indulgence or a Little Caesar's-style treat, this recipe provides the flexibility and simplicity to achieve restaurant-quality results in your own kitchen. So, gather your ingredients, embrace the process, and prepare to delight yourself and your loved ones with the unparalleled taste and texture of your very own soft, fresh milled whole wheat breadsticks. Happy baking!
